Nib Tuning Primer
Nib tuning is the practice of getting a nib to write more to your preference or more reliably without changing its shape (or changing it too much anyways). Here I will lay out some of the basics for how to tune your own nibs. There are several resources out there describing some of the techniques used so I’ll talk about which ones have worked for me. This will be a primer on round point nibs (so not cursive italics, architects, ect.). I’ve grown confident enough that I will tune my own pens including some of my more expensive pens.
It's at this point that I offer a general disclaimer: Do not try this on pens if you are worried about ruining them. You can do some real damage to your pens and ruin them past repair attempting these techniques. If you take it slowly and start with pens you understand may be ruined you can start to make some real progress and get to the point where you can tune more expensive pens, but it will take a while. You will be voiding the warranty on any pen by doing this. I recommend starting with your pens that have an easily replaceable nib such as Jowo, Lamy, or Jinhao. Once you get better you will (sometimes) be able to fix those pens you may have messed up earlier. I am just giving you information and am not responsible for any damage to your pens so please go slowly and carefully.
So where do you start? The first thing you will need to do is pick up some materials.
Materials:
Loupe - Any jewelers loupe will be good enough as long as it has at least 10x magnification. Anything less than that is not really sufficient. But bigger is not always better either. I’d recommend somewhere between 10x and 30x as that's what I’ve used in the past.
Micromesh - 12000 grit micromesh is the best for this. There is a certain brand that everyone uses called Micro-Mesh (there’s even a TM in there). This is not actually interchangeable with sand paper grit so make sure it is micromesh. Also while you can get Micro-Mesh in lower grits I’d recommend starting with 12000. It will be more than enough to start with (One time I ground a cursive italic with just 12000 grit micromesh, so it can still move material).
Lapping film/Mylar paper - This is essential to getting a buttery smoothness on your pens. There are two different “grits” to get 1.0 micron and 0.3 micron to start out with. The conversion to English units (like a grit) is slightly complicated but I believe that 1.0 micron is actually rougher than 12000 grit micromesh and is therefore technically not needed but I pick it up anyways.
Brass Shims - A shim is just a small piece of relatively flat material. People like to use brass because its so soft that its less likely to damage your nib. I’m not sure how much danger there is of that but I go with brass anyways. The sheets I’ve used are around .003 inch thick and cut into 2 inch by 1 inch rectangles. They’re are used for getting all kinds of gunk out from between the tines.
Now you might be thinking to yourself right now: Isn’t this exactly what’s inside the Goulet Pens nib tuning set? Well you’d be right, literally all of these are available together in a bundle at Goulet. It’s actually where I got my first materials for tuning pens that I still use. Depending on how you feel you can of course buy them all separately and you will likely save money by buying bulk.
Diagnosis:
Finding out what is wrong with your pen is around 70% feel and 30% visual. Mostly what I’d say is to take note of how something feels and go mostly off of feeling when troubleshooting a nib then you can take a look at how something looks and take note of what is different or what looks out of place.
The first thing that I usually do it to fill the pen with ink that I know the properties of. I can’t stress this enough, try and use either one ink for all the pens you are tuning. Preferably one that has very neutral properties such as Waterman Serenity Blue. If you plan on using one ink in the pen you are tuning I’d use that ink. I either use Waterman Serenity blue or a Pilot Iroshizuku ink (Kon Peki, Take Sumi, and So Ryo).
One thing not to do is to dip a pen or use a pen that you have just filled without de-saturating the feed. What I mean by this is that the feed should not be overflowing with ink when you tune it, there should be no ink in the fins. Usually after I fill a pen I will use a paper towel to take all the excess ink out of the feed then wait an hour (or like 10 min for the impatient).
Flow Problems:
This is the most preferential of the “problems” that you can encounter with a fountain pen. Usually people have a dry pen that they want to make wetter. But this can always go the other way around as well. If you’re unsure of what to look for I’d suggest that you try and hold your pen at the back end and drag the pen around under its on weight. It should write when there is no pressure applied (flex nibs are a whole other story). But your own preference is the gold standard don’t feel pressured to adjust the pen if you like the flow.
Scratchiness:
This is likely what you are really here for. How to get your pen to that buttery smoothness that many of us dream about (I’ll have something a little later for those that want their pens to have more feedback).
There are two types of scratchiness to really look out for here. The first is what is generally called feedback. Its the feeling of resistance when moving across the page. Maybe it makes a bit of a sound. This is mostly caused by how smooth the nib tipping is. The second is true scratchiness, when the tine is digging into the page and feels as though it is going to tear the page. This type is generally caused by a misaligned tine or the shape of the tipping.
Skipping:
To diagnose skipping write a phrase on your favorite paper. I’d pick something you write often or if you plan on doing lots of tuning, pick a phrase. I’d pick something that starts with a single down stroke. I find a single down stroke to be the mostly likely stroke to skip. This is where you will find the baby’s bottom issues (yes they really do call it that) and the hard starting issues.
Depending on whether you are a burgeoning nib miester or someone who just wants to tune your pens for fun I’d recommend some different approaches. If you are just tuning for yourself no need to do anything than your normal writing routine. However, if you are planning on practicing for eventually* using your skills one someone else’s pens practicing using light and quick strokes will be best. This will make a pen skip more so tuning for that will cover your bases.
*Note: Don’t take this article as license to start taking work as a nib miester, only do something to someone’s pen that you would do to your own expensive pens. You need to have real experience and be 100% sure you can do what you say you are going to do with their pen.
Fixing Flow Issues:
The first step in fixing any pen is always to deal with flow issues. This is because in the course of fixing flow issues you can make significant changes to the smoothness and the alignment of the nib (more on that later). The main thrust of making your pen wetter is to increase the distance between the two tines of your pen.
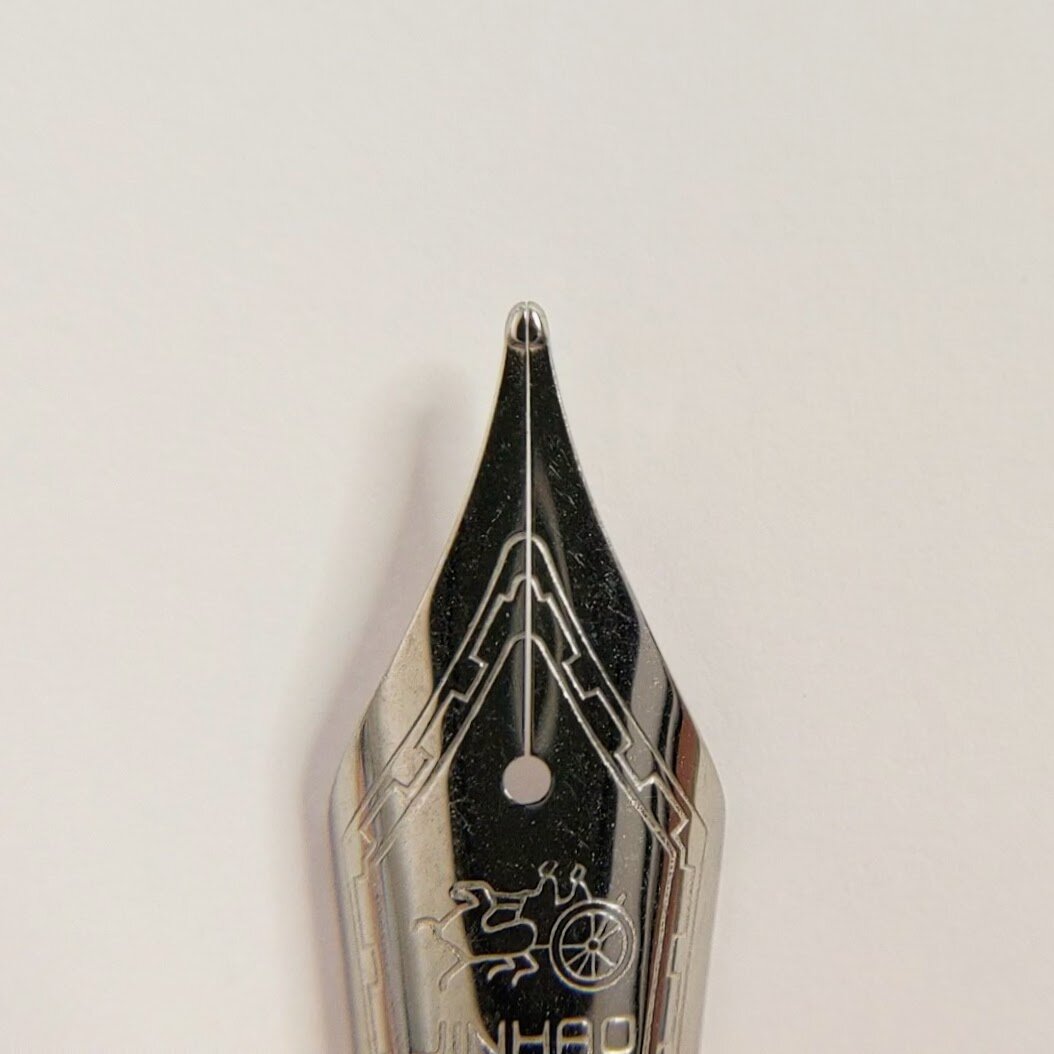
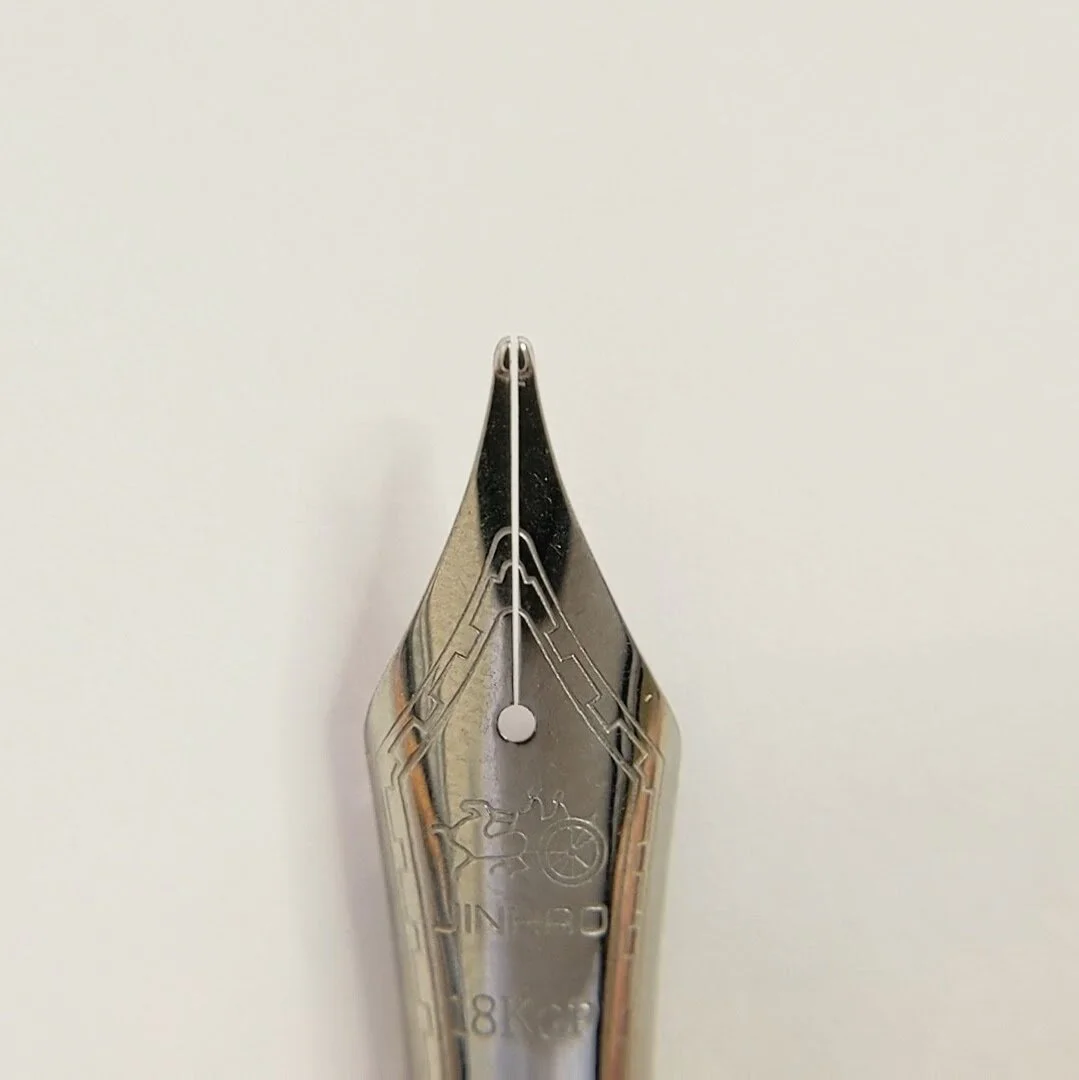
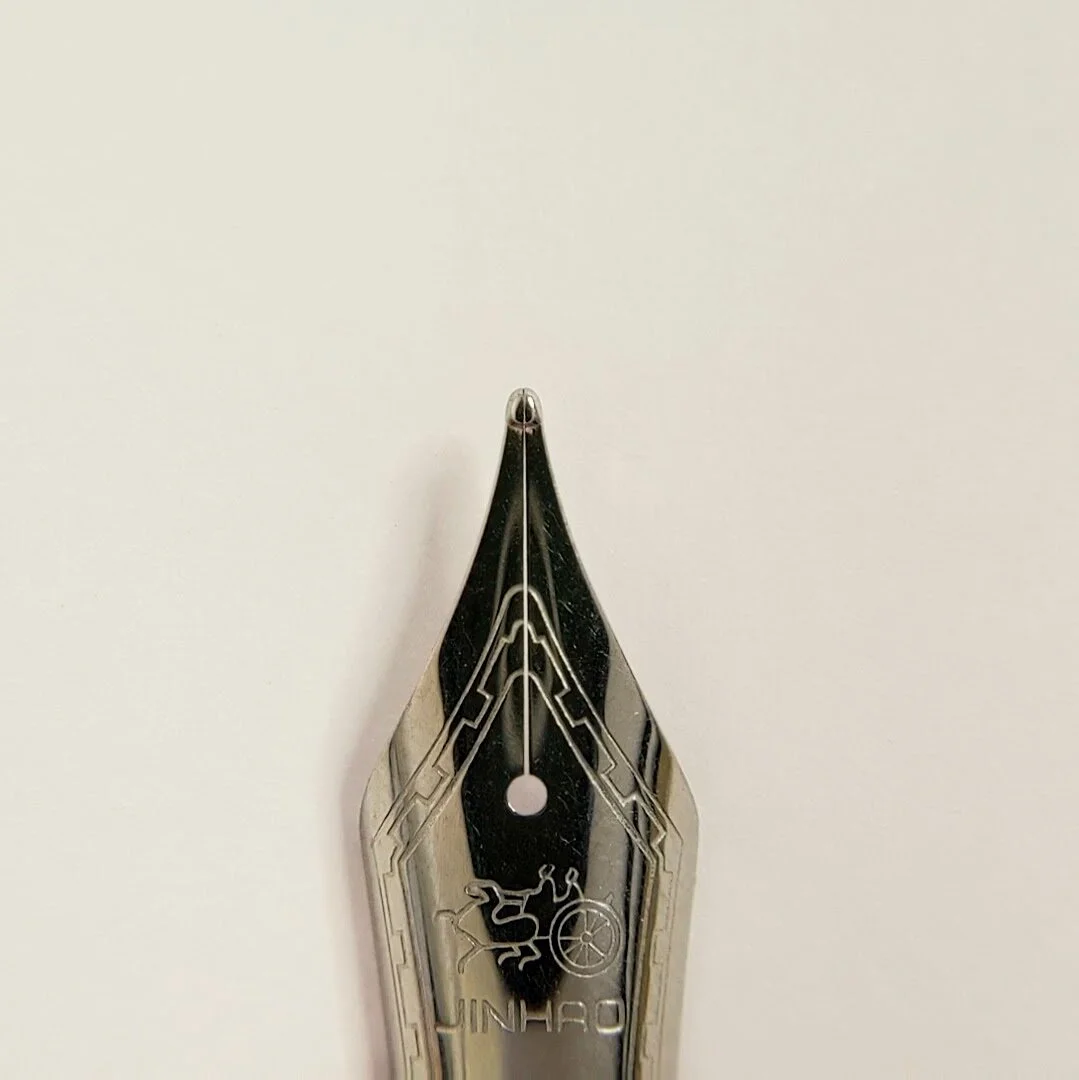
As you increase the distance between the tines the flow of the pen will increase. However, this is only true up to a point. Once you start to spread the tines too much the flow will no longer reach the tip of the nib and you will start to get hard starting. A general rule of thumb is to make sure that the width of the nib slit is wider at the breather hole than it is at the tip (I have it on some authority that this is not always 100% the case, but I have found it to be true 99% of the time). Also as far as how small the gap can be, you want the tines to be close together but not touching (except for flex nibs which actually should be touching). I’ve compiled some examples of what I mean by having a proper tine gap. In order they go Well Tuned, Gap Too Large, and then Tines Touching:
The picture below is of a Well Tuned tine gap. The gap gets narrower toward the end of the nib, at the tipping material, and is smaller than the gap at the breather hole.
The picture below is of a Too Large tine gap. This tine gap is too big at the tipping as it is larger than the gap at the breather hole. This will give you hard starting and perhaps not write at all.
The picture below is of a tine gap that has the Tines Touching. The tines are touching at the tipping and therefore it will not write under its own weight and will be a very dry writer requiring some pressure to write.
The main way of making a nib wetter is the one that Kirk Speer from Pen Realm shows here. The method is to simply spread the tines by directly pulling on the shoulders of the tines. With the feed facing you, place your thumbs’ fingernails on the inside of the nib shoulders with a finger on the top of the nib then pull the shoulders apart. One thing to keep in mind is to go slow with this. It is easy to make a pen a little wetter but if the gap gets too large between the tines then it becomes much harder to make a pen drier. Go slowly, pull gently, and then test the pen after each small adjustment. Trust me if you go slowly it’ll save you a ton of time.
Here is an example of this technique:
Making a Nib Drier:
Making a nib drier is actually fairly difficult. This is because there is a lot of room to move the tines outward but not much room to move them toward each other before they hit. Metal needs to be bent a certain amount before it will stay in place (called plastic deformation). One way to get around this and have more room is to cross the tines and push that way. You place one tine over the other and press them inward then you switch which tine is on top and repeat. Here is another Kirk Speer video showing exactly how to do this.
Fixing Scratchiness:
Fixing scratchiness is a 2 step process that must go in the order that I’m about to show. Anything out of this order will lead to problems and may not fix or even make your nib problems worse.
Step 1: Tine alignment
This is the first step to any smoothness problems is the alignment of the tines. If the tines are not aligned correctly then you will get a scratchy nib no matter how smooth the surface of the nib is. This is where the loupe will come in handy. Hold your pen upside down with the back end tilted down at the angle you normally write at. This is because you want to be looking at the part of the tipping that is touching the page while you write. So check your own writing angle and try it duplicate that angle front of the loupe. I’ve included an example here:
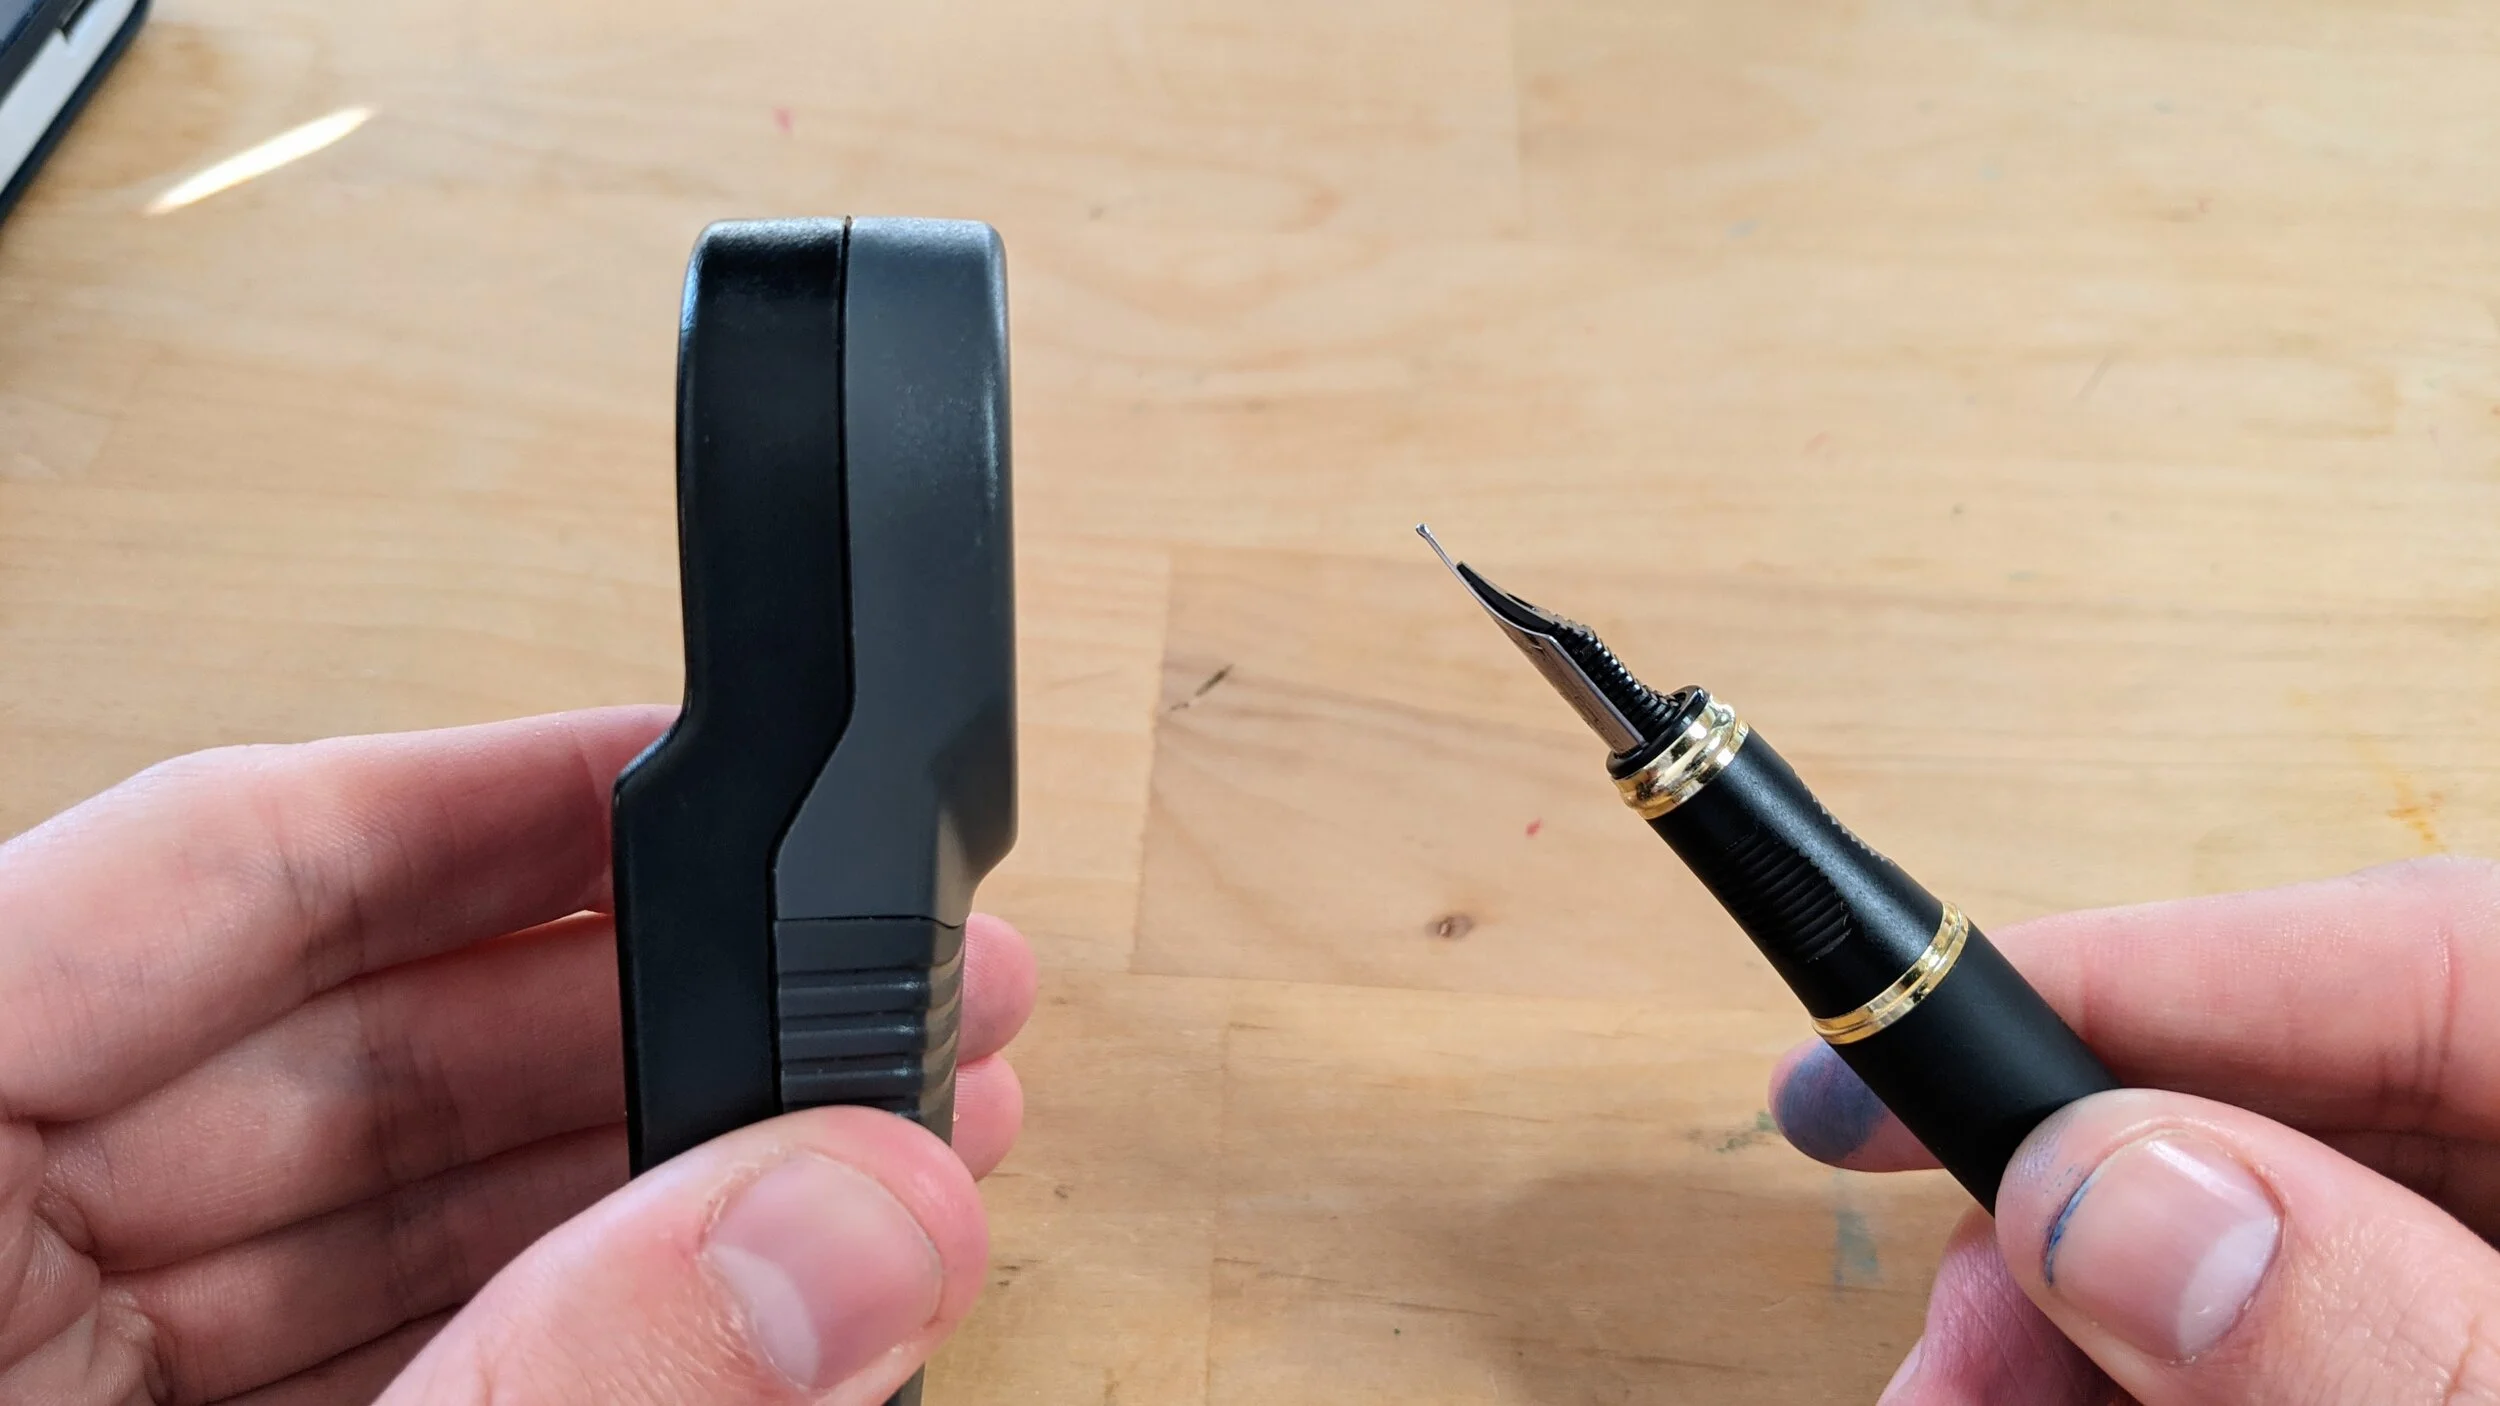
A miss aligned tine is fairly easy to fix and will be rather obvious as one tine will be sticking out above the other. The goal is to have the two tines completely even (harder than it sounds). I suggest getting it in as best you can and then testing it. If it feels smooth and looks even then you are good to go. Here is an image of what it looks like to have misaligned tines:
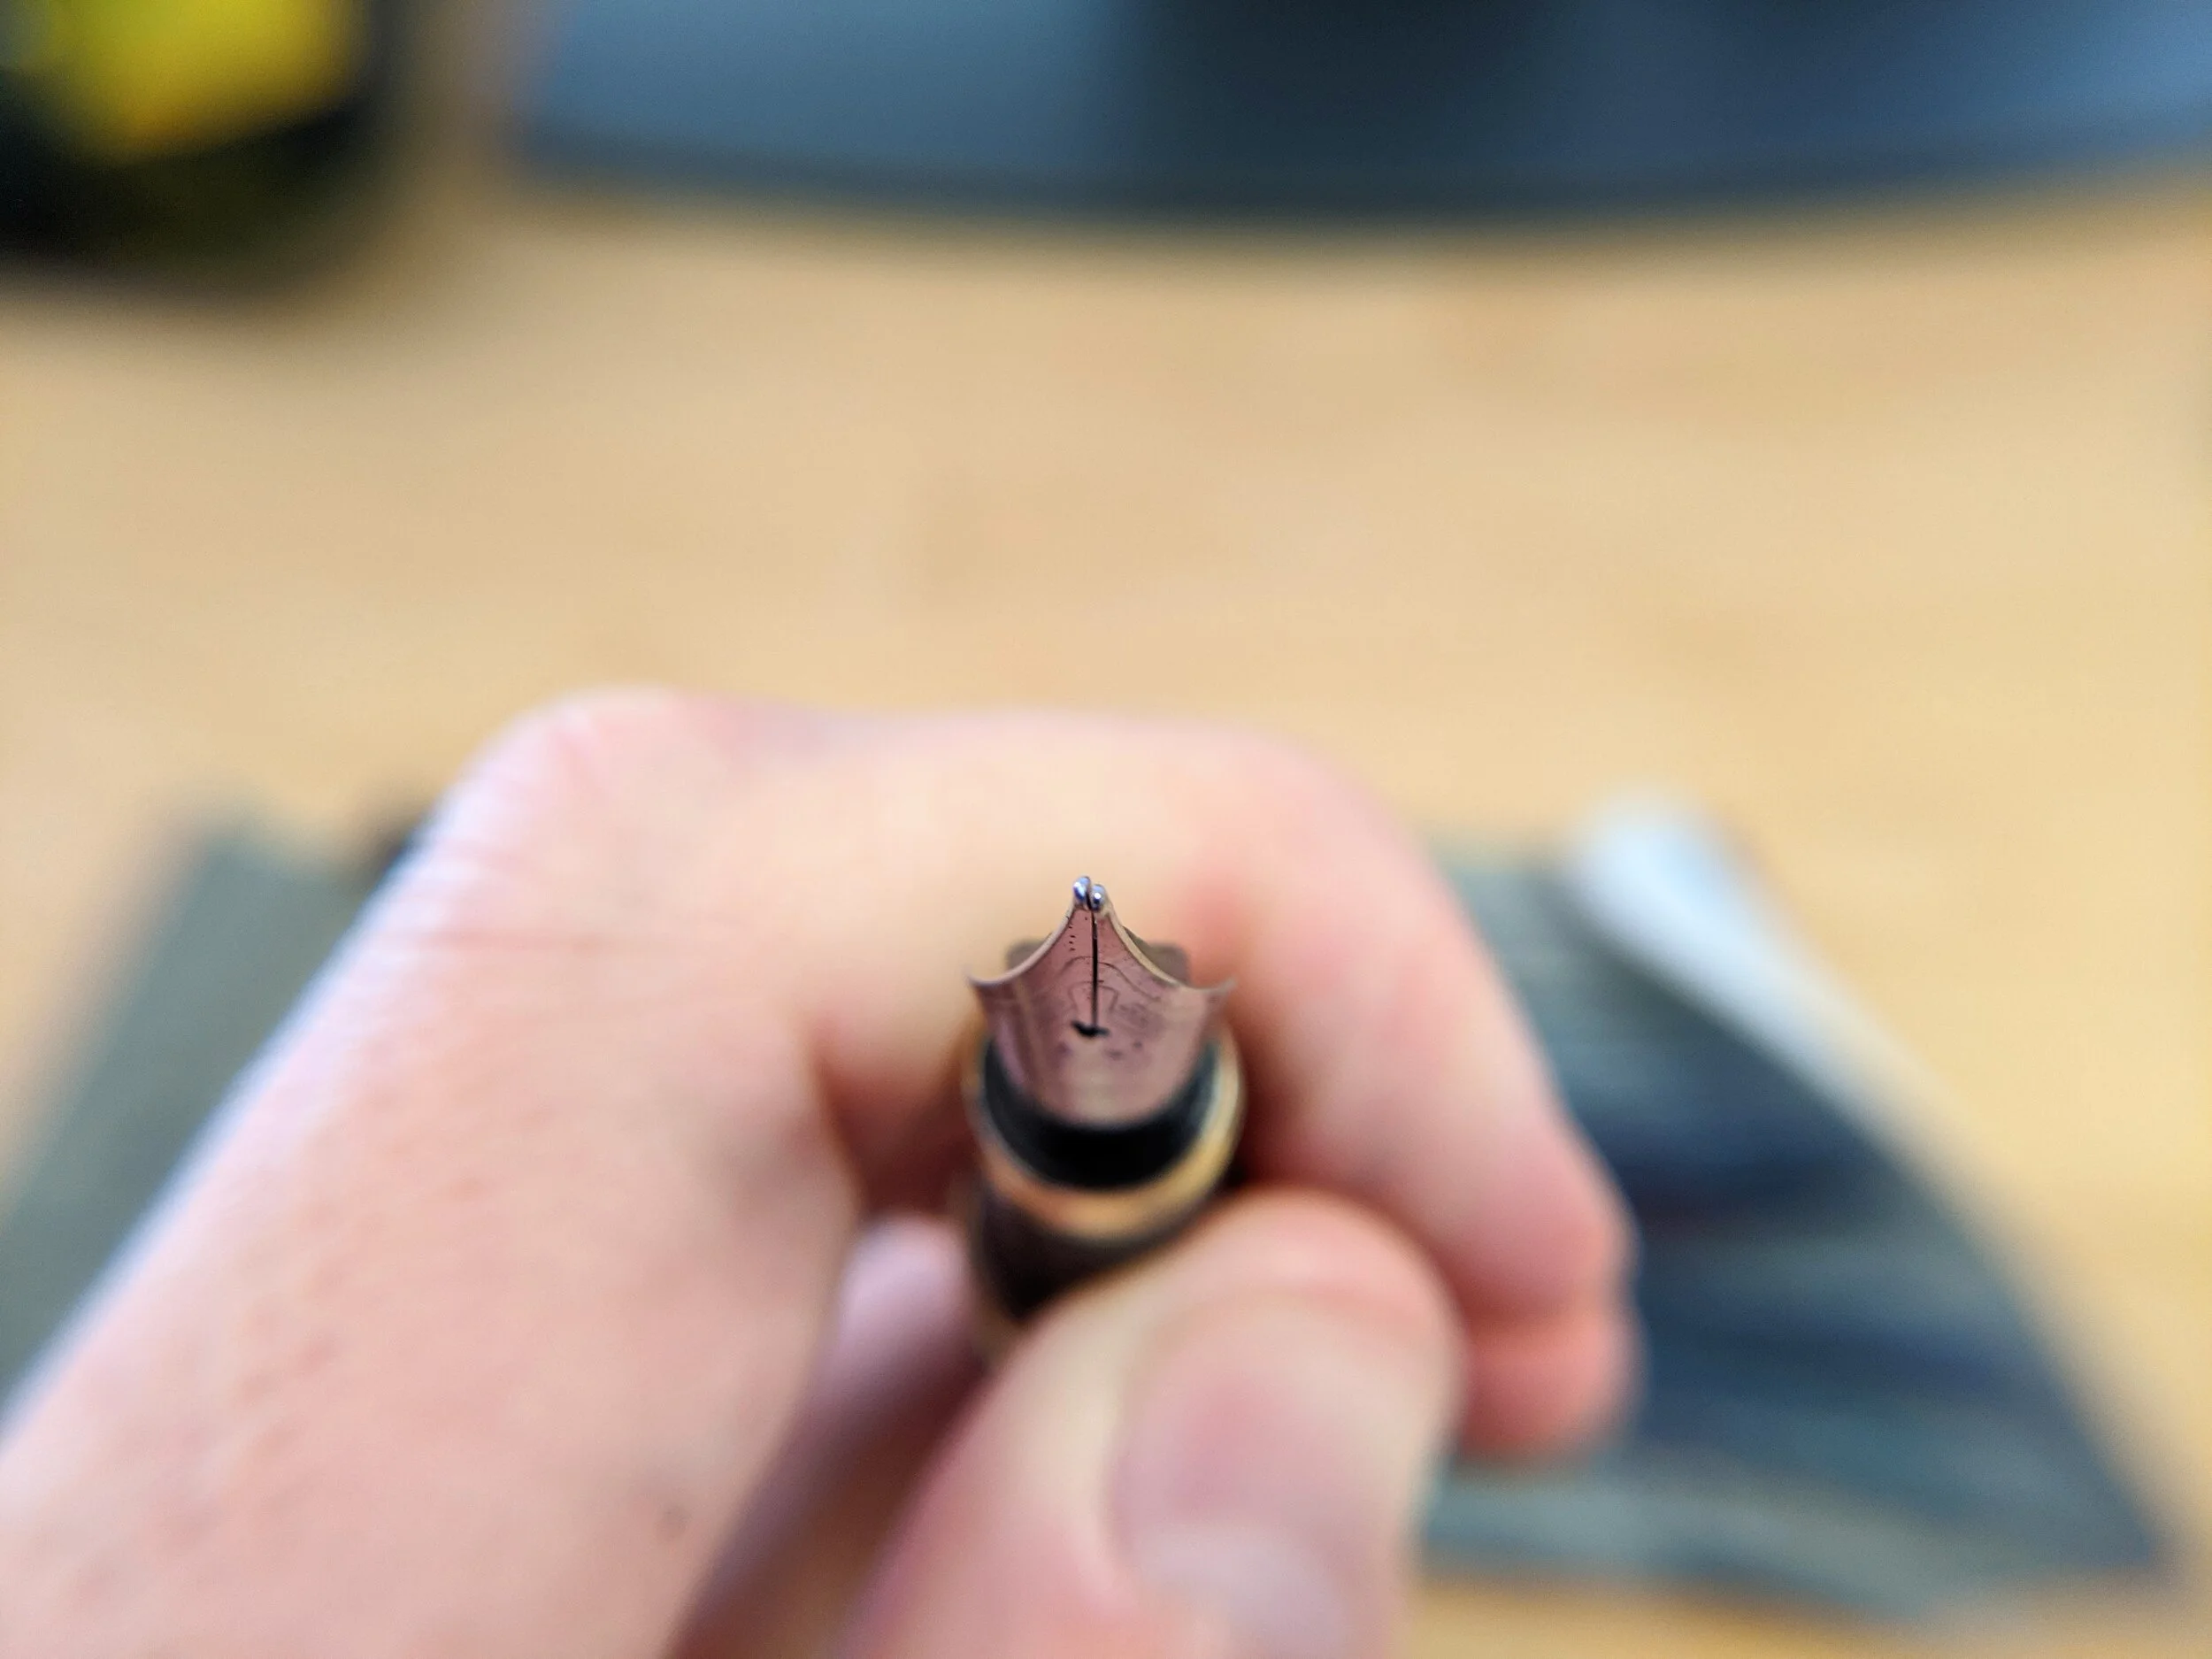
This is slightly exaggerated version just to show a clear example, but I have seen some nibs that have looked like this. What to do next is to push the tine that is higher (from a right-side-up perspective) downward (toward the feed). In this case that would be the right hand tine. You usually want to push tines toward the feed rather pushing them away from the feed. This is because if you constantly push tines upward you can create a gap between the feed and the nib, breaking capillary action and reducing flow.
This comes from Brian Gray of the Edison pen company in this video. However, I find that sometimes pushing down on the tine toward the feed can put a lot of stress on the feed so proceed with caution either way.
Make sure that you take this slowly and don’t push or pull too hard. Push/ pull on the nib a little and check your work with the loupe. Make small adjustments and get a feel for how the nib moves. Each nib will move differently depending on how stiff the nib is. The stiffer the nib the more it will stay the the position you push/ pull it to. A nib with more spring will require you to push it farther to get a similar amount of movement as a stiffer one. Always always use your fingers. NEVER use pliers for this, you will cause much more harm than good.
Here is a demonstration of me pushing in the right tine:
Now here is a way to do the same thing by pulling on the left hand tine (away from the feed):
Do small adjustments until you are satisfied with the alignment of the tines. I would do a visual inspection but ultimately whatever feels smoothest on the paper is what you should go with. Remember its mostly feeling and a small part visual. Ideally you are doing this with a cheap pen so I encourage you to experiment with a cheap nib to see what alignment gives you the best feeling. It should look something like this:
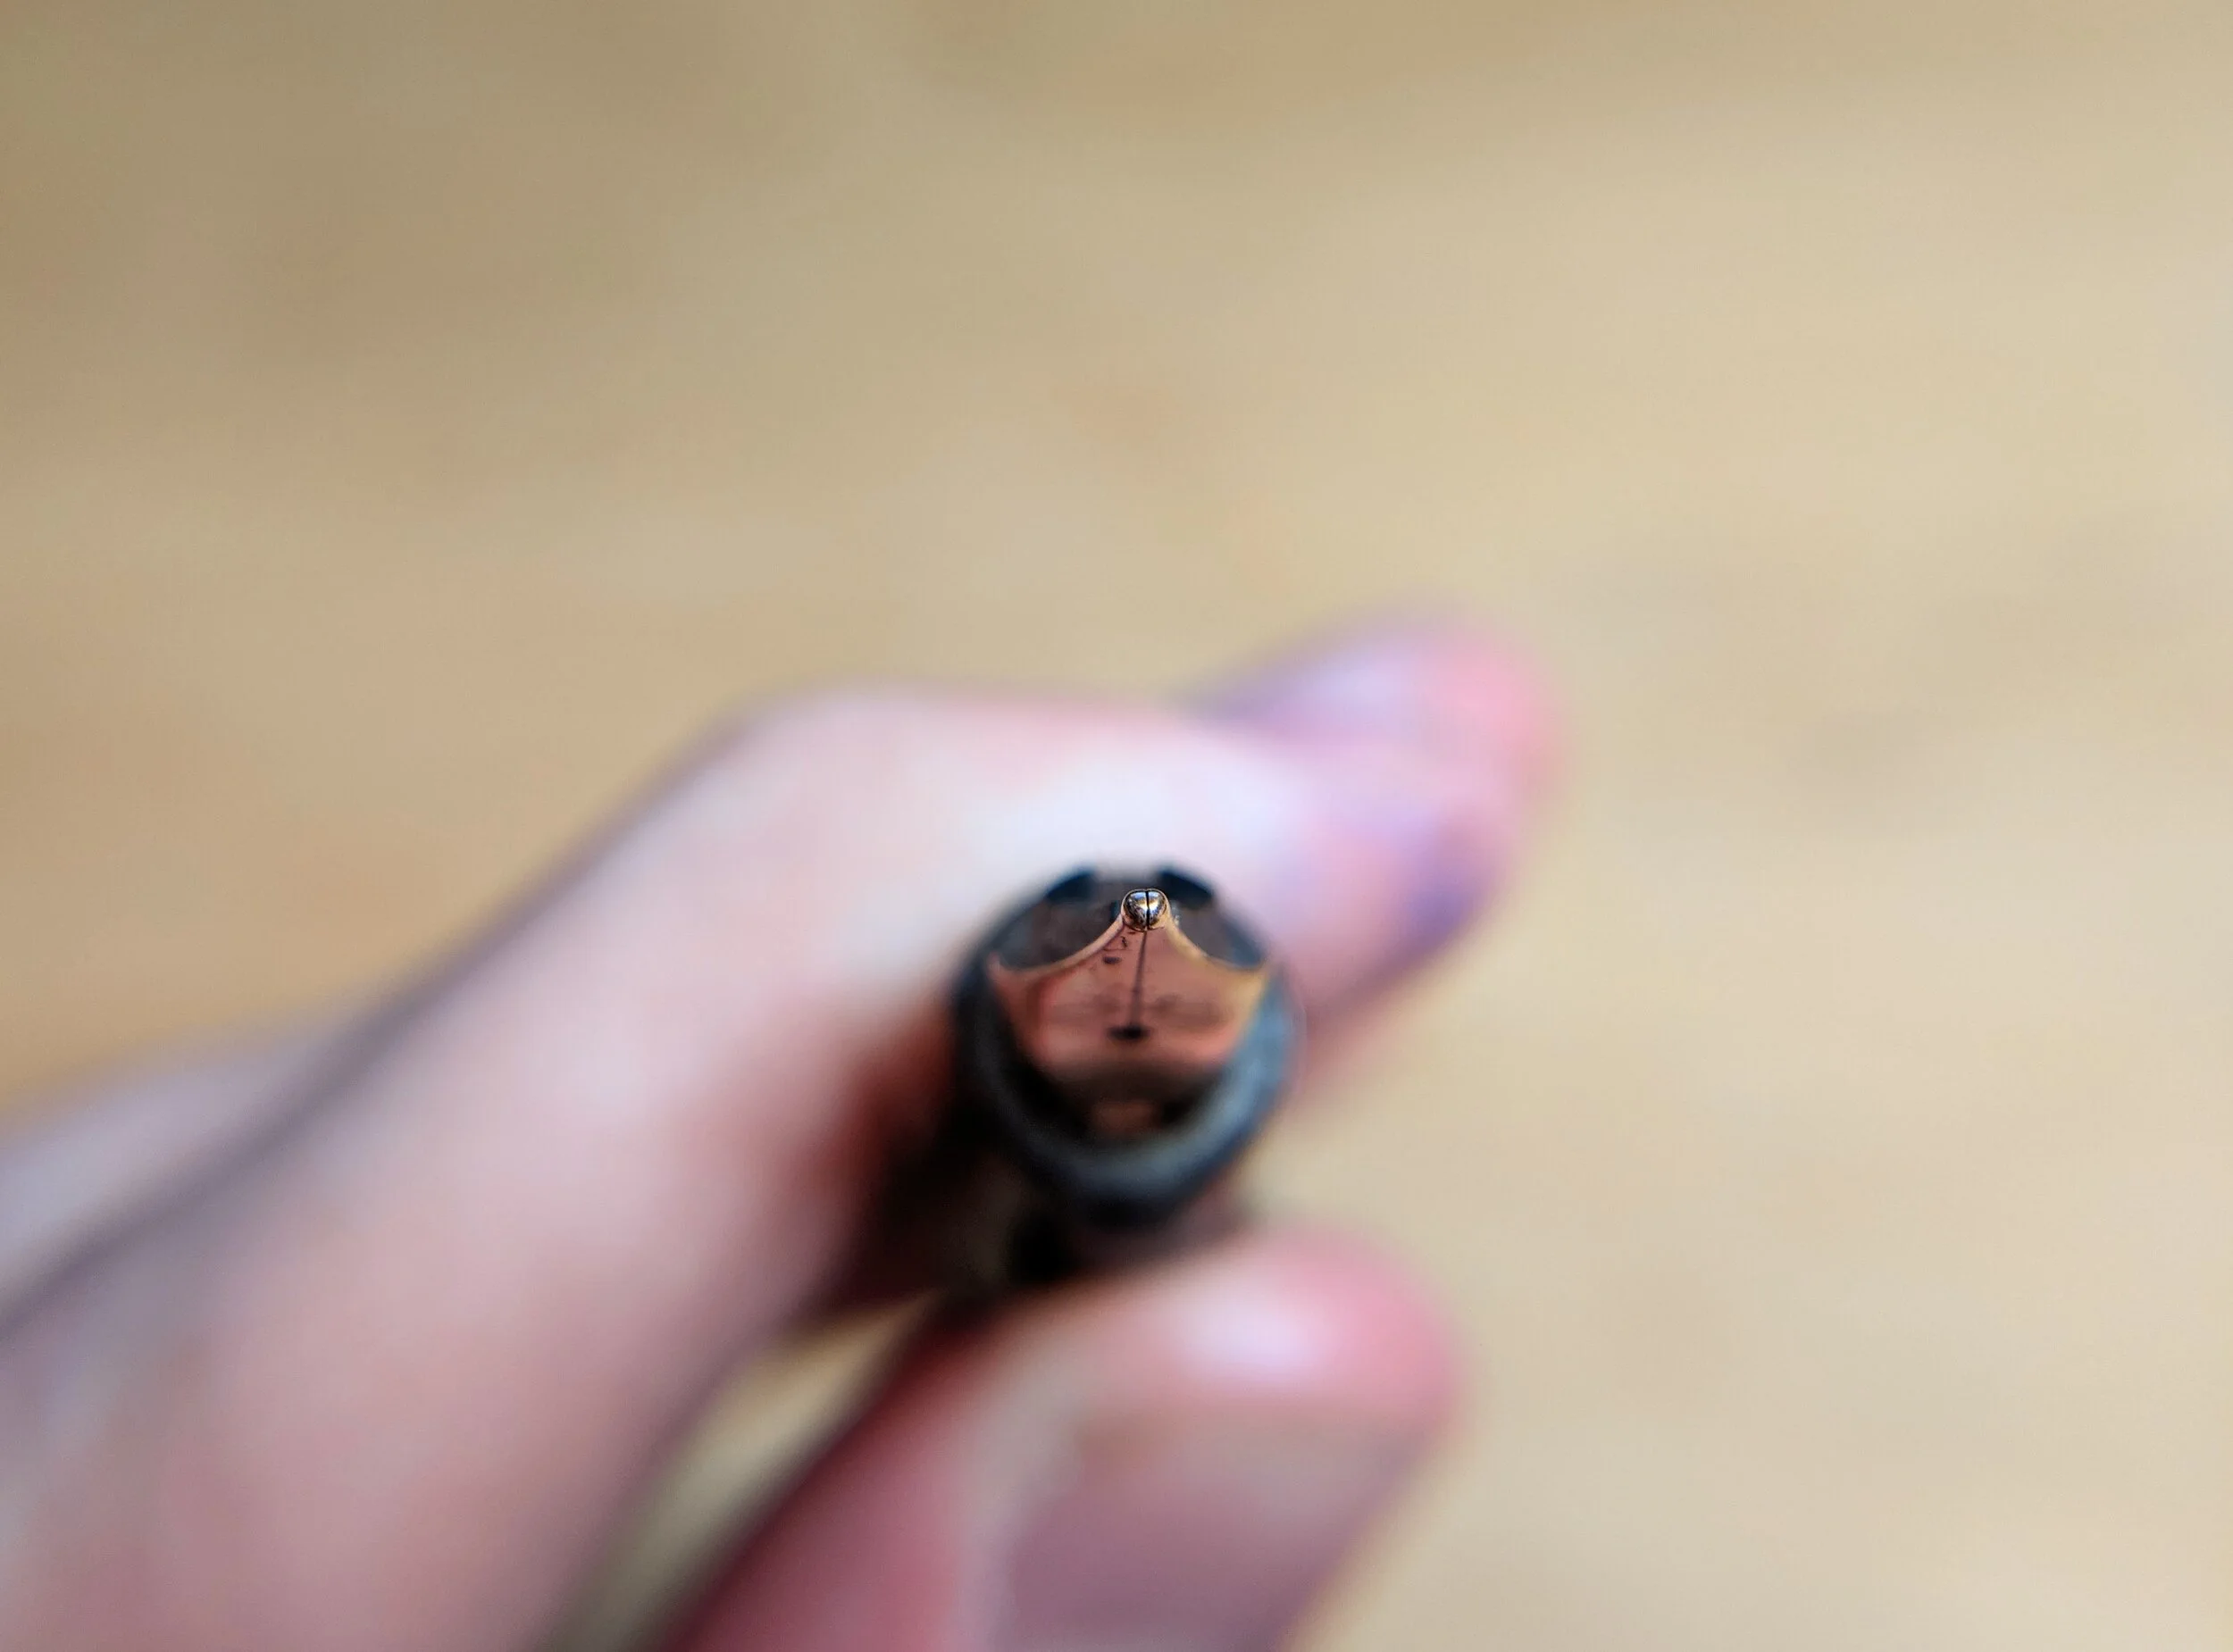
If your pen is still not as smooth as you would like then you should move on to the next step of actually smoothing the surface of the nib.
Step 2: Smoothing the surface
About surface roughness:
Smoothing the surface of a pen is going about changing the surface roughness of the tipping of the pen. On a microscopic level the surface of pen tipping has small bumps and scratches, the size of these small imperfections will determine how smooth the tipping is, the smaller the better (direction of the scratches can matter to some degree as well). So your goal is to get these scratches to be finer and smaller than they are now as that will give you a smoother experience on the paper.
The finer and smaller the grit of the abrasive (in this case micromesh and mylar paper) the finer and smaller the scratches you are putting into the tipping of the pen and therefore the smoother the experience on the paper. One thing to keep in mind is that if you use rougher abrasives the scratches can only be taken out by a slightly less rough abrasive. So if later you want to experiment in grinding and use some stones or diamond wheels and the nib is really rough you will need to do step downs from rough to smooth. This is why we start with the 12000 grit micromesh and move to the lapping films after.
Also it’s important to note that the harder you press into the abrasive the deeper the scratches are as well. This can work to both your advantage and disadvantage. If you are trying to smooth out the pen then maybe you don’t want to press harder and have the deeper scratches. On the other hand if the regular amount of pressure you are using does not smooth out the pen then maybe there are deeper scratches already in the tipping that you need more pressure to get out.
To Figure 8 or Not to Figure 8:
One thing that I want to dispel is a myth that you need to use figure 8’s. Figure 8’s do work, they are the most often recommended way to do smoothing but they are not necessary. The premier nib tuner Richard Binder always said that you do not need to use figure 8’s to smooth (note here that it doesn’t say you can’t if you would prefer to) and indeed he didn’t teach others to tune using figure 8’s. You can find plenty of good nib meisters who will swear by figure 8’s as the best way to do smoothing. Everyone’s own experience will be different when it comes to what works for them. I’ll outline some things that have worked for me. I’m not saying they are the best, just that they have worked for me (there are some interesting arguments for figure 8’s but I’ll save that for another article).
For those that want to stay with the figure 8 method or for who does not know what I am talking about here is Mat from the Pen Habit doing some smoothing with figure 8’s. Another resource would be Brian Grey doing some instruction on a long YouTube video.
Richard Binder’s method:
The method that I use is one that I got from Richard Binder’s notes on the class he used to teach. The notes are available on his website if you search for Richard Binder’s Nib Smoothing Workshop. I’m going to paraphrase this from what he says as I have used this method and it works well (I tuned the ASC Arco pen that’s the thumbnail to this article with this method).
You start with the pen parallel to the table and move the nib side to side over the 12000 grit micromesh. While you keep the pen parallel to the table and moving side to side, roll the pen in your hand so the feed is facing first right then left. This is so the sides of the nib are also polished and not just the bottom. After you have done this tilt the back of the pen up slightly and repeat. Once you get to about 45 degrees instead of rolling the pen switch to swinging the back end of the barrel from side to side while you are still moving the nib side to side on the micromesh. Binder calls this an upside down pendulum motion. Continue to do this until you get to 90 degrees and the pen is straight up.
If that sounded confusing (I am also a visual learner) I made a video of me doing this:
Hopefully this makes things clear. The reason for the rotations is that you need to make sure you don’t create what is called a foot. If you only keep the pen on one spot then you will create a flat spot. This flat spot will be smooth on the surface but have sharp edges where it ends. This will make it very uncomfortable and be fairly hard to fix, so make sure you are rotating the pen as shown in the video.
If you have a persistent problem you might have to do this 2 or 3 times but be gentle. The abrasives do take off material and if you are using a pen with only a little bit of tipping it is possible to actually run out of tipping. This is why I generally suggest starting with at least a medium to start with. It will make everything much more forgiving that way.
Working out the Burrs:
So often after you are done doing this type of smoothing you have some directions that may have just a little bit of a catch to it. This can be the inner part of the tines catching slightly. What companies (and nib miesters) do to make a nib smoother is to round the inside of the tines of a nib slightly (or not so slightly). This will significantly improve the smoothness of the pen. However, there are risks involved, overly rounded inner tines will skip and hard start. This is what people call baby’s bottom and its a difficult problem to fix (the next section will go into babies bottom further).
So you’ve now got a pen but it still feels like it catching on something, maybe on some diagonal stroke. One way to work this out is something that I learned from a John Mottishaw video. He would do small circles with the pen on the page and find which direction was scratchy just by which direction feels scratchy. Then you gently do a few strokes on the micromesh in that direction and it should take care of this burr. I would go slow, you don’t need to bear down on the nib or do that many strokes. Do one or two and see if you’ve fixed the problem (often you have).
Finishing Touches:
The last step to take it to the next level with the lapping film/ mylar paper. You want that buttery smoothness that you have always dreamed of. My technique is fairly simple. To reduce the pressure of the nib on the mylar paper (to get scratches that are less deep) what I do is I hold the pen in one hand and the mylar lapping film in the other. I hold the pen with the nib up and the feed facing me. Then going from left to right I gently run the film over the tipping. I start at the bottom of the tipping and work my way up. I go in sections, all the way across in short strokes at the bottom of the tipping then slightly higher and higher until I’ve done the entire thing. I usually do this with the 1.0 micron lapping film and then with the 0.3 micron directly after. It really does make a huge difference considering that its not much.
Here is a video demonstration of this technique:
For some complicated reasons, that I don’t have the space to get into this article (and lets face it its already way too long), making a pen this smooth may make it more prone to skipping. So be careful with the smoothing and the rounding of the inner tines. A pen with a little feedback will likely be more reliable than one that is very smooth. Its a bit of a trade off.
Some Feedback:
Adding feedback should be done in the exact same manner as the mylar lapping film technique but with some abrasive material. Mark Bacas touches on this in a video of his. You just take a wet dry sandpaper of 2000 or 2500 grit, usually found at the auto parts store, and use the same technique that I showed for the mylar lapping film.
Chasing your own Tail:
On a more philosophical note, nib tuning can often feel like you are chasing something that you can never get to. You fix one thing and something else goes wrong. You get the perfect left upward diagonal stroke but then the left downward stoke is scratchy. Everything you fix seems to create new problems. You can’t seem to get that perfect nib that writes smooth as butter in all directions and now you feel as though you have ruined a pen that you used to love, that in hindsight only really had minor problems compared to what you have just done to it (catastrophizing is my specialty). What you want to do now is put down the pen, take a break, sleep on it, and come back in a day or even a few days. This type of work can be frustrating, especially when you are just starting out and don’t understand what you are doing wrong. Fresh eyes and some perspective will do wonders, sometimes you are able to fix the problem in 5 minutes and sometimes it wasn’t really even a problem. Take the break, you won’t regret it and it may save a nib.
Fixing Baby’s Bottom:
This is one of the more difficult problems to fix and I’m a bit hesitant to say that you should do this on your own if you are a beginner to tuning nibs. Often this is something that plagues more expensive nibs. But I do want this knowledge to be out there.
Why is it called Baby’s Bottom:
While I wish someone had thought of a better name for this problem “baby’s bottom” is actually fairly descriptive and illustrates the problem quite well. The term brings to mind the saying smooth as a baby’s bottom and indeed the nibs with this problem are very smooth. A nib with baby’s bottom will have excessively rounded inner tines where the nib meets the page.
Because of some reasons having to do with surface tension (that I will talk about in a later article) this type of shape does not allow flow to go to the very tip of the nib. It is similar to why a nib with a Too Large tine gap will not allow ink flow, capillary action does not allow flow in this way. So the ink never touches the paper and this gives hard starts. This is also why if you press harder on a nib that skips it will skip less, you are physically pushing the part of the tipping where the ink is closer to the page.
Here is an example of what it looks like on a pen:
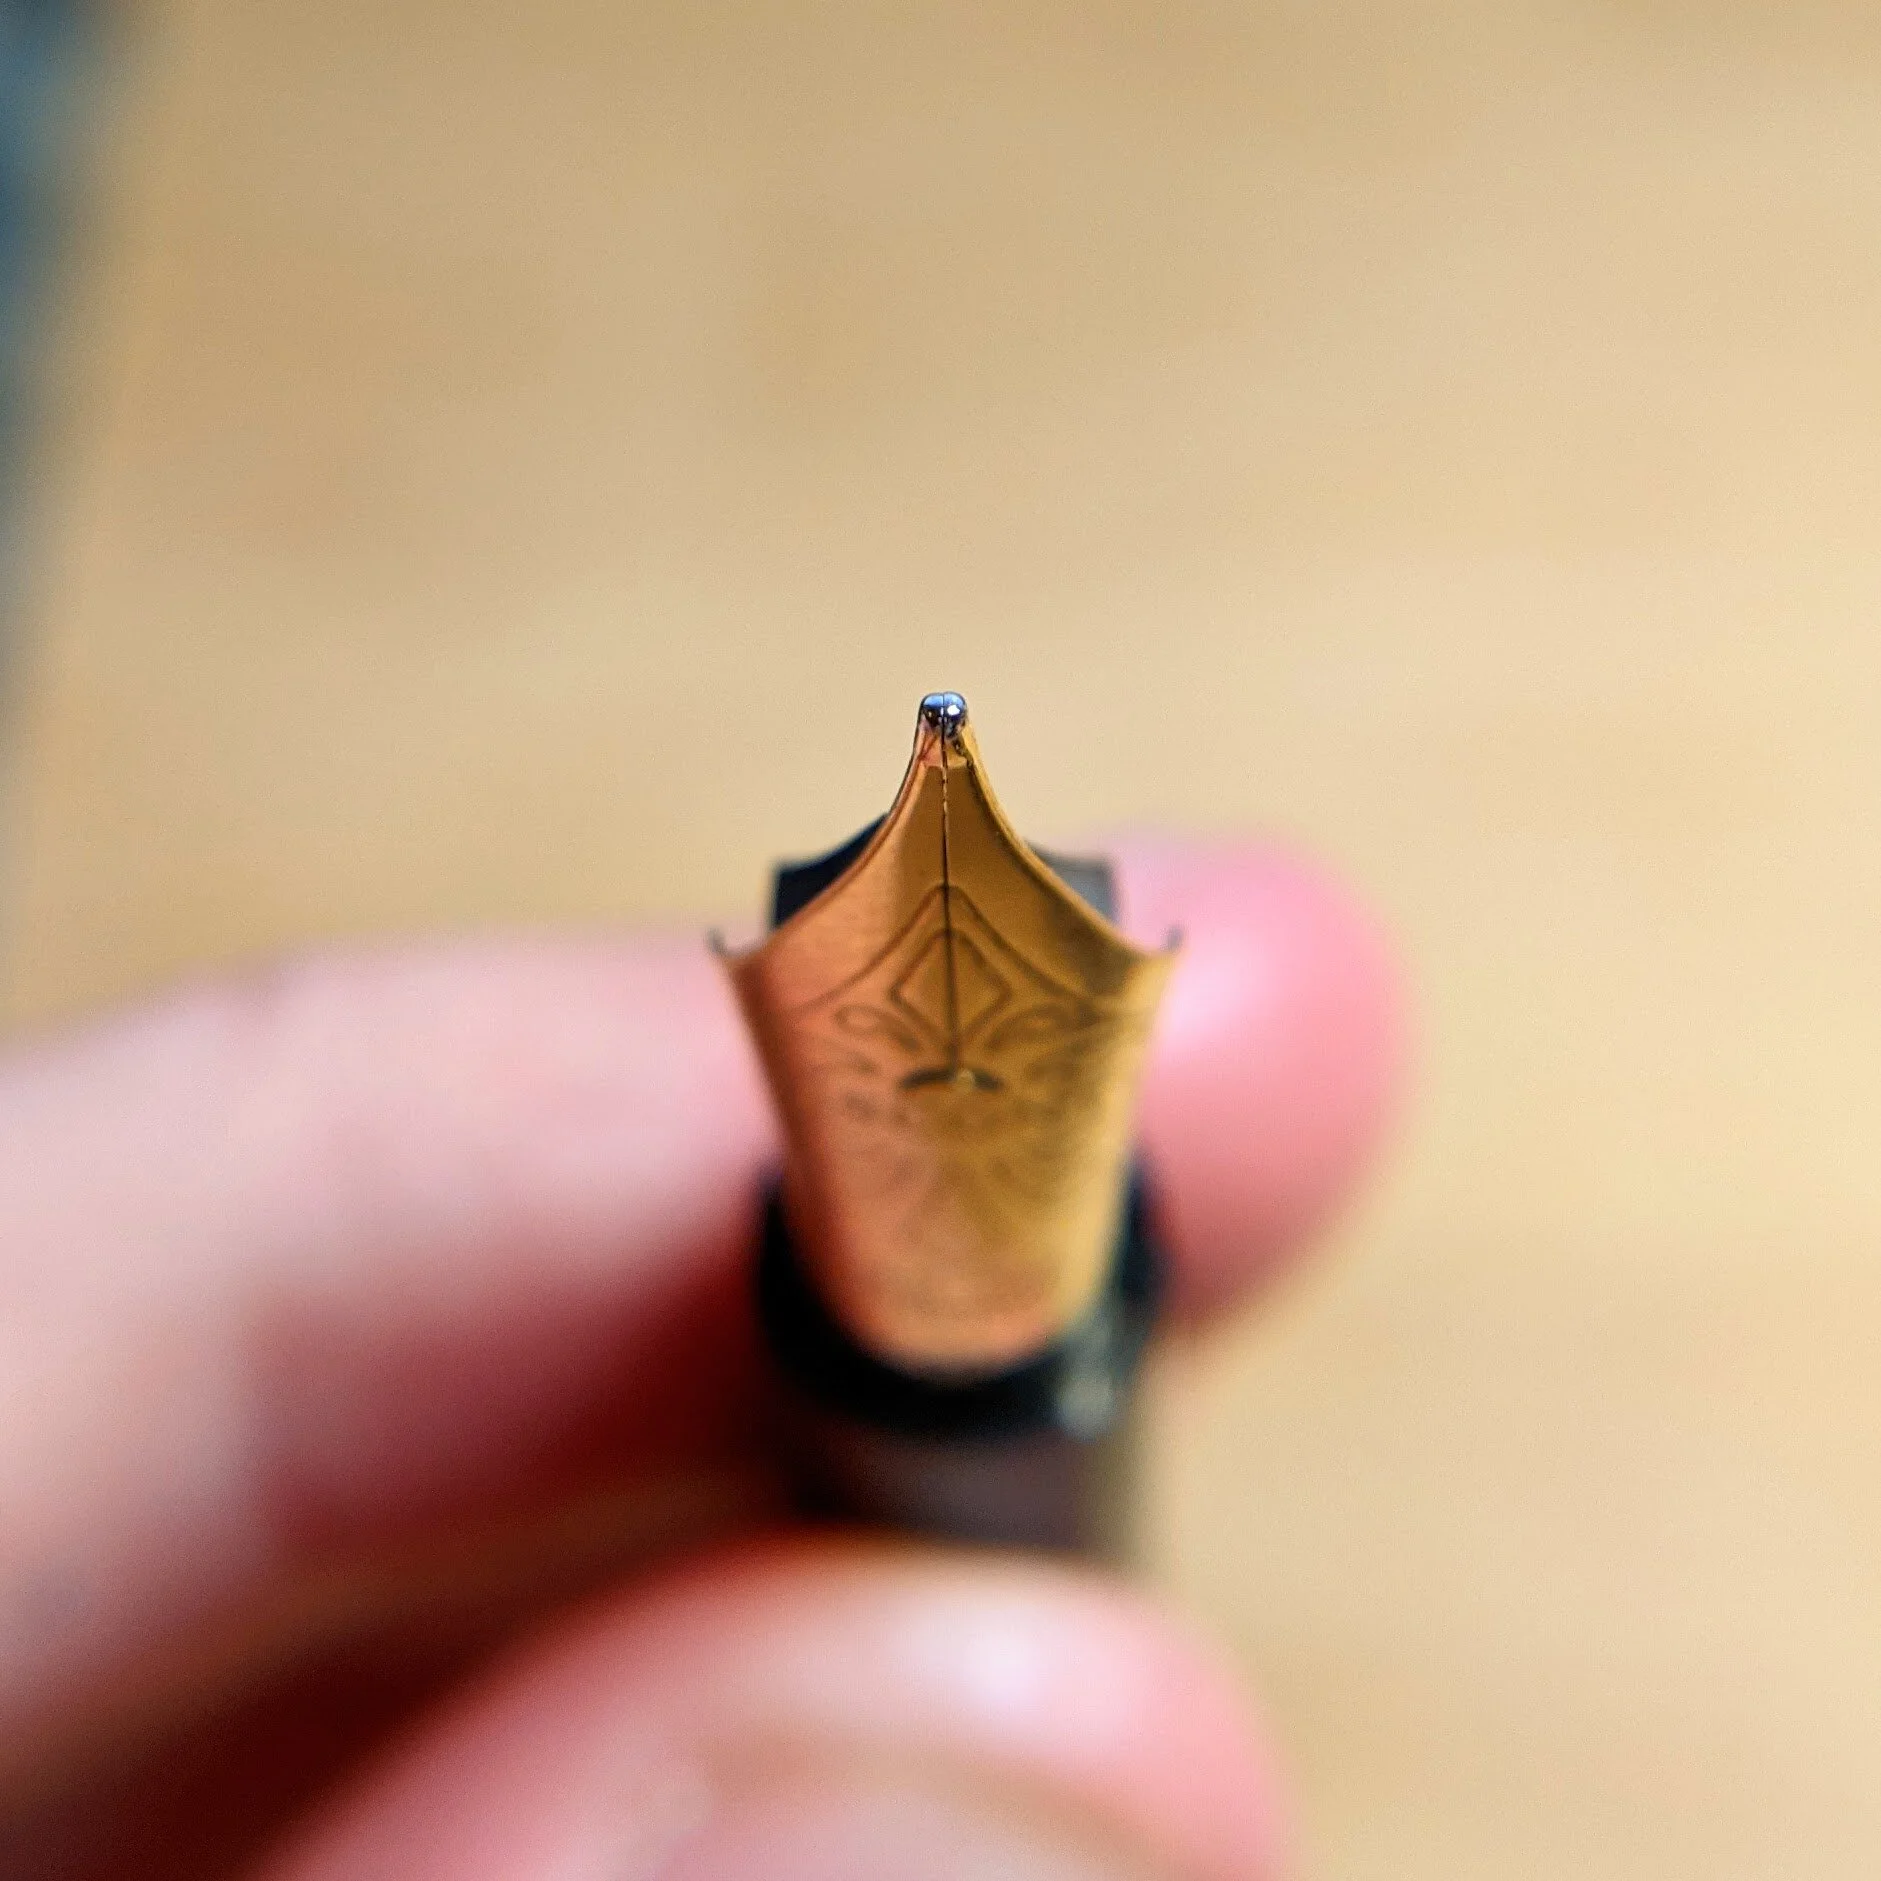
You can see how the tines round inward and there is the appearance of a “baby’s bottom”. This not the worst example I’ve ever seen but it was the only one I had on hand. You’ll notice that this is a Visconti nib that came on a very expensive pen. It illustrates the point I was making earlier that the pens most likely to have this problem are expensive.
Resurfacing:
The remedy for this to resurface the nib. You want to take off material as it will shave down the two tines slightly. This will give you a shorter distance between the ink and the paper and make the skips happen less often. This can be done just as the smoothing was done. You can just do the Richard Binder method of smoothing and you will be able to get rid of the baby’s bottom.
However, with the micromesh it will be fairly slow going (and therein lies the danger). To speed this up you can use some slightly rougher micro meshes. As rough as 6000 and 8000 are not too rough and will be suitable. Also hard Arkansas stone and hard black Arkansas stone are very useful for this type of thing and aren’t too aggressive. These are some serious abrasives and will be dangerous to use especially on an expensive nib. You really can ruin a nib beyond repair with these tools. Use the rougher abrasives and test the pen often. The resurfacing should be done with the roughest abrasive and you should not have fixed the skipping before you move to changing the surface finish for smoothness. I recommend testing for hard starts with a quick and light downstroke. This is the stroke most likely to skip just due to the shape of a nib.
This process may make the pen less smooth as the inner tines will catch on the page more but you should still be able to make something that has a balance between the skipping and the smoothness. Its all up to personal preference (its one of my pet peeves to have a nib that skips so I always opt for sharper inner tines and less skipping).
Some last thoughts:
These things are all personal preference and so how you want your nibs to feel is completely up to you. Hopefully with these techniques you will be able to really improve your pens and your pen experience. I also encourage you to experiment (on cheap/throwaway nibs), there are lots of ways to do these things and we are just at the beginning of what can be accomplished with fountain pen grinds. New nib miesters are coming up really fast and the internet is making it possible to share this information. I hope I have provided a sufficient gateway into tinkering with your pens and seeing what you can do.
I hope you enjoyed this article! I’m glad to be a part of the fountain pen community and am really thankful for the support I have gotten thus far. Feel free to send me an email at minabekopens@gmail.com. I would love to hear from you with comments, extra sources, pictures of your own pens you’ve tuned, or suggestions for new topics and improvements.